ADDING CLIPBOARD FACILITIES UNDER WINDOWS, Alan Salmon
Although SPL version 2.65 and higher can access the windows clipboard (when running the windows version of course!), this facility is not built in to the main modules.
Getting fed up of having to exchange data between Smart Spreadsheet and Microsoft Excel (by way of export/import R2-123) (for those peasants who insist on using Microsoft bloatware), I decided to write a function for the spreadsheet module to copy a block of cells to the clipboard, and another one to paste from the clipboard into the current worksheet.
By creating ‘SMART.MNU’, a menu definition file, these two functions can be accessed from the main menu.
Let’s take a closer look at the requirements. First I had to determine how text has to be stored on the clipboard for applications to realise it’s rows and columns. I discovered that each cell within a row is separated by a TAB character (chr(9)), and each row is separated from the next with a LINE FEED (chr(10)). The task seems relatively straightforward – two nested loops – one going through the rows, the other going along the rows; taking the contents of each cell, converting it to text if it’s a number, building up a string to put into the clipboard. The difficult bit was actually allowing the user to define a block – the blockmark function allows this, and returns a string with the block address. Converting the result to co-ordinates that were useable was the tricky part. A block has many possibilities – eg r1c2:5, r2:5c1:5 etc., the parsing becomes non-trivial.
Finding the top-left corner of a block can be achieved by EVALUATE "AT "|block$ and getting the cursor’s location with the ROW and COLUMN functions. The ‘evaluate’ is needed because the blockmark function returns a string, and AT needs a block. Next I want to know where the bottom right corner is, to set up the loops. This is done using the functions ROWS and COLUMNS, which again need to be EVALUATED because the argument is a block. I couldn’t get this to work until Paul informed me that if I wanted to evaluate a let statement in this circumstance , the variable concerned had to be public. Now a simple loop from Row1 to Row2, from Col1 to Col2, getting the contents of the cell and building up the string, finally putting it in the clipboard can be written.
The data can be sent out of smart into excel and other packages without exporting lotus files. This was not enough, deciding to go the extra mile and paste back into smart. Not only does this mean I can get data back from Excel etc, it can also be used as an alternative to EDIT VALUE-COPY FROM within smart. This is quite straightforward – get a string from the clipboard and parse it. A chr(9) (tab), end of a cell, and chr(10) (linefeed), end of a row. A decision to paste into the location where the cursor was, rather than asking the user to specify was made. After all this is the way windows works. (I know this is not consistent with the Copy above, but you can’t highlight cells first in smart anyway!)
Again find out where the cursor is, and remember it for future rows. Read up to the first non-printing character, decide if it’s really a number (VAL(t$)=0 means it’s text), ISSTRING could also be used. Use SSPUT , then if I got to a TAB move one cell right, if it was a LF, move to the next row.
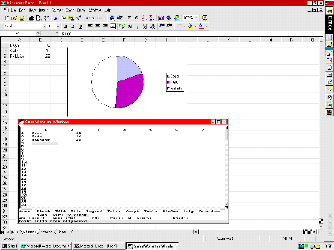 |
This screen shot shows a smartware session running over Microsoft Excel, with cut and paste active. |
How do I get this into the menu? Custom menu items can be created by writing a text file called ‘SMART.MNU’ – documented in the system manual. This file should either live in the application working directory, or smartware system directory. The former if you only want it for one application, the latter for all. In my case I always want it available, so put it in c:\angoss\oasys (again thanks to Paul – I thought that angoss\bin was the application directory.
- 1,1,Copy,c:\angoss\oasys\clipcopy.rf1,Copy cells to clipboard
- 1,2,v-paste,c:\angoss\oasys\clippast.rf1,Paste cells from clipboard
The first number (1) is the module, 1=spreadsheet, the next number represents what menu to put the new command on (1-5 for main, 6-9 for the Quit menu, 10-14 for tools menu, 15 help menu, 16 Remember Tools menu. Then we have the command – the first letter is always the accelerator key, hence Paste is written v-paste as p is already used, and windows uses ctrl-v to paste! Then we have the project file name, and finally the autohelp text. The code for both functions, _CELL2CLP and _CLP2CELL is presented on the program code pages.